Scenario
A group of slave-traders (who were thought to be operating out of Marzibar) set up a temporary base inside an old abandoned coastal fort on the border between the Britannic Colony of New Surrey and Fezian Madasahatta. The area was disputed territory. According to the Fezians the fort was in Fezian Madasahatta, but maps produced by Britannic surveyors definitely showed it as being part of New Surrey.

The slaver-traders – who were led by the infamous Ali Yusuf – had arrived by dhow, and quickly restored the old fort. They stationed two Field Artillery Units (each armed with smooth-bore cannon) within the fort along with a Unit of Infantry armed with single-shot rifles. A similarly armed Infantry Unit occupied a nearby abandoned native village whilst a third Infantry Unit remained aboard the dhow.

In order to stop any possible slaving raids into Britannic territory the Governor of the Colony – Sir Reginald Goodman – had ordered military units to eject the slave-traders ('Remove that nest of Sea Rats!') and destroy the fort so that it could not be used for such a purpose in the future. The forces he had allocated to the task comprised:
News of the impending movement of Britannic troops into the disputed territory caused consternation amongst the Fezian hierarchy in Madasahatta. The Governor – Abdullah Rahman – immediately ordered his military subordinate – Colonel Saleh Usman – to assemble a force with which to 'protect the sovereignty of Fezian territory'.
Colonel Usman mobilised two Infantry Units (armed with single-shot rifles) and a Field Artillery Unit (armed with rifled field artillery) as well as the armoured gunboat Osman III (commanded by Lieutenant Harun Mohamed). He also requisitioned two dhows to transport his force to the disputed area.
Turn 1
The Britannic force sailed down the coast towards the disputed area, led by HMS Indolent.

Turn 2
Whilst the two steam-powered passenger ships moored so that they could begin unloading their cargo of soldiers and military equipment, HMS Indolent sailed further along the coast to investigate the fort.

Turn 3
As soon as she came in sight of the fort, HMS Indolent was fired upon, but suffered no damage. She returned fire with her heavy armament ... and inflicted casualties upon the Unit of Field Artillery that had fired at her.

In the meantime the first Britannic Units had been unloaded from their transports.

Turn 4
HMS Indolent continued to trade fire with the fort with the result that HMS Indolent suffered some minor damage and the Unit of Field Artillery was destroyed!

By now the Britannic force was unloaded from its transports ...

... but the slave-traders had not been idle and two of the Infantry Units began to advance to meet the 'invaders' ...

... whilst the dhow manoeuvred so that she could sail out to engage HMS Indolent.

Turn 5
Before the advancing slaver-traders could get into single-shot rifle range they were engage with artillery fire from HMS Indolent and the Britannic Field Artillery Unit. This not only caused casualties amongst the slaver-traders but also forced one of the Infantry Units to retreat.

The Britannic Infantry Units used this opportunity to advance towards the fort.

The slave-traders countered by moving forward and firing at the leading Britannic Infantry Unit (The Madasahatta Rangers) ...

... whom they decimated!

In the meantime the slave-traders in the dhow were slowly making progress out of the small harbour they had been moored in and towards HMS Indolent.

Turn 6
The casualties cause to the Madasahatta Rangers showed that the slaver-traders were not going to be an easy enemy to defeat. As the main advantage enjoyed by the Britannic force was its firepower, Colonel Wells ordered HMS Indolent and the Field Artillery Unit to fire at the advancing slave-traders. The Field Artillery Unit's fire destroyed the leading slave-trader Infantry Unit and HMS Indolent's gunfire inflicted a casualty on the other slave-trader Infantry Unit, which seriously depleted its strength.

As this was happening the Fezian convoy came into sight, heading towards the fort.

The slaver-traders in the dhow immediately crammed on all available sail and made their escape seaward, leaving their compatriots to fend for themselves!

The remaining slave-traders (led by Ali Yusuf) fell back towards Fezian territory ...

... and the Britannic troops again began to advance on the fort.

Turn 7
As there were no suitable targets, neither side fired their artillery at their opponents. The slave-traders occupied the jetty near the fort ... and proceeded to surrender to the Fezians!

The Britannic troops continued to advance, led by the Madasahatta Rangers who were intent upon exacting their revenge on the slave-traders for the casualties they had suffered.

Turn 8
A Fezian Infantry Unit stormed ashore from the dhow that had been transporting it whilst the second dhow moored next to the fort prior to landing the troops it carried. The gunboat Osman III - carrying Colonel Usman – steamed towards HMS Indolent and signalled that the Colonel requested an urgent meeting with Colonel Wells, whom he rightly assumed was aboard the Britannic warship.

Realising that the situation had drastically changed and that there was a distinct possibility that fighting between the Britannic and Fezian troops could break out at any moment, Colonel Wells signalled the Britannic troops to stop advancing with immediate effect. This order was not well received by the Madasahatta Rangers, but they grudgingly obeyed it.
Turn 9
Whilst the Fezians rounded up and disarmed the slave-traders …
… the Britannic and Fezian commanders held a conference aboard HMS Indolent.

Colonel Wells knew that the fort was situated in disputed territory, and did not want to risk starting a war without approval from his government. His force had achieved its aim – the removal of the slave-traders – but he wished to make sure that they could not return at a later date. Colonel Usman realised that his force was out-gunned by the Britannic troops and gunboat, and he looked for some way in which he could ensure that he protected 'the sovereignty of Fezian territory' without risking an all-out fight with a potentially stronger adversary.
After some considerable discussion the two Colonels agreed that the fort should be destroyed by explosives. These would be provided by the Britannic Marines and the fuse would be lit by a Fezian officer. The slaver-traders (or 'traders' as the Fezian Colonel insisted on calling them) were taken into 'protective custody' by the Fezians, who returned them to Marzibar.
Turn 10
After the explosives had been set, the fort was destroyed in a huge explosion.

It is rumoured that an independent Boundary Commission is to be set up to adjudicate where the actual border between the Britannic Colony of New Surrey and Fezian Madasahatta lies ... but who knows how long that will take nor what could happen in the interim?
A group of slave-traders (who were thought to be operating out of Marzibar) set up a temporary base inside an old abandoned coastal fort on the border between the Britannic Colony of New Surrey and Fezian Madasahatta. The area was disputed territory. According to the Fezians the fort was in Fezian Madasahatta, but maps produced by Britannic surveyors definitely showed it as being part of New Surrey.

The slaver-traders – who were led by the infamous Ali Yusuf – had arrived by dhow, and quickly restored the old fort. They stationed two Field Artillery Units (each armed with smooth-bore cannon) within the fort along with a Unit of Infantry armed with single-shot rifles. A similarly armed Infantry Unit occupied a nearby abandoned native village whilst a third Infantry Unit remained aboard the dhow.

In order to stop any possible slaving raids into Britannic territory the Governor of the Colony – Sir Reginald Goodman – had ordered military units to eject the slave-traders ('Remove that nest of Sea Rats!') and destroy the fort so that it could not be used for such a purpose in the future. The forces he had allocated to the task comprised:
- The armoured gunboat HMS Indolent (commanded by Lieutenant Commander Barrington Muir)
- A unit of Marines (which will be transported aboard HMS Indolent)
- An Infantry Unit of the Scotia Highlanders (armed with magazine rifles)
- An Infantry Unit of the Madasahatta Rangers (armed with magazine rifles)
- A Machine Gun Unit
- A Field Artillery Unit (armed with rifled field artillery)
- Two steam-powered coastal passenger ship that will each carry an Infantry Unit and the Machine Gun Unit or Field Artillery Unit
News of the impending movement of Britannic troops into the disputed territory caused consternation amongst the Fezian hierarchy in Madasahatta. The Governor – Abdullah Rahman – immediately ordered his military subordinate – Colonel Saleh Usman – to assemble a force with which to 'protect the sovereignty of Fezian territory'.
Colonel Usman mobilised two Infantry Units (armed with single-shot rifles) and a Field Artillery Unit (armed with rifled field artillery) as well as the armoured gunboat Osman III (commanded by Lieutenant Harun Mohamed). He also requisitioned two dhows to transport his force to the disputed area.
Turn 1
The Britannic force sailed down the coast towards the disputed area, led by HMS Indolent.

Turn 2
Whilst the two steam-powered passenger ships moored so that they could begin unloading their cargo of soldiers and military equipment, HMS Indolent sailed further along the coast to investigate the fort.

Turn 3
As soon as she came in sight of the fort, HMS Indolent was fired upon, but suffered no damage. She returned fire with her heavy armament ... and inflicted casualties upon the Unit of Field Artillery that had fired at her.

In the meantime the first Britannic Units had been unloaded from their transports.

Turn 4
HMS Indolent continued to trade fire with the fort with the result that HMS Indolent suffered some minor damage and the Unit of Field Artillery was destroyed!

By now the Britannic force was unloaded from its transports ...

... but the slave-traders had not been idle and two of the Infantry Units began to advance to meet the 'invaders' ...

... whilst the dhow manoeuvred so that she could sail out to engage HMS Indolent.

Turn 5
Before the advancing slaver-traders could get into single-shot rifle range they were engage with artillery fire from HMS Indolent and the Britannic Field Artillery Unit. This not only caused casualties amongst the slaver-traders but also forced one of the Infantry Units to retreat.

The Britannic Infantry Units used this opportunity to advance towards the fort.

The slave-traders countered by moving forward and firing at the leading Britannic Infantry Unit (The Madasahatta Rangers) ...

... whom they decimated!

In the meantime the slave-traders in the dhow were slowly making progress out of the small harbour they had been moored in and towards HMS Indolent.

Turn 6
The casualties cause to the Madasahatta Rangers showed that the slaver-traders were not going to be an easy enemy to defeat. As the main advantage enjoyed by the Britannic force was its firepower, Colonel Wells ordered HMS Indolent and the Field Artillery Unit to fire at the advancing slave-traders. The Field Artillery Unit's fire destroyed the leading slave-trader Infantry Unit and HMS Indolent's gunfire inflicted a casualty on the other slave-trader Infantry Unit, which seriously depleted its strength.

As this was happening the Fezian convoy came into sight, heading towards the fort.

The slaver-traders in the dhow immediately crammed on all available sail and made their escape seaward, leaving their compatriots to fend for themselves!

The remaining slave-traders (led by Ali Yusuf) fell back towards Fezian territory ...

... and the Britannic troops again began to advance on the fort.

Turn 7
As there were no suitable targets, neither side fired their artillery at their opponents. The slave-traders occupied the jetty near the fort ... and proceeded to surrender to the Fezians!

The Britannic troops continued to advance, led by the Madasahatta Rangers who were intent upon exacting their revenge on the slave-traders for the casualties they had suffered.

Turn 8
A Fezian Infantry Unit stormed ashore from the dhow that had been transporting it whilst the second dhow moored next to the fort prior to landing the troops it carried. The gunboat Osman III - carrying Colonel Usman – steamed towards HMS Indolent and signalled that the Colonel requested an urgent meeting with Colonel Wells, whom he rightly assumed was aboard the Britannic warship.

Realising that the situation had drastically changed and that there was a distinct possibility that fighting between the Britannic and Fezian troops could break out at any moment, Colonel Wells signalled the Britannic troops to stop advancing with immediate effect. This order was not well received by the Madasahatta Rangers, but they grudgingly obeyed it.
Turn 9
Whilst the Fezians rounded up and disarmed the slave-traders …

… the Britannic and Fezian commanders held a conference aboard HMS Indolent.

Colonel Wells knew that the fort was situated in disputed territory, and did not want to risk starting a war without approval from his government. His force had achieved its aim – the removal of the slave-traders – but he wished to make sure that they could not return at a later date. Colonel Usman realised that his force was out-gunned by the Britannic troops and gunboat, and he looked for some way in which he could ensure that he protected 'the sovereignty of Fezian territory' without risking an all-out fight with a potentially stronger adversary.
After some considerable discussion the two Colonels agreed that the fort should be destroyed by explosives. These would be provided by the Britannic Marines and the fuse would be lit by a Fezian officer. The slaver-traders (or 'traders' as the Fezian Colonel insisted on calling them) were taken into 'protective custody' by the Fezians, who returned them to Marzibar.
Turn 10
After the explosives had been set, the fort was destroyed in a huge explosion.

It is rumoured that an independent Boundary Commission is to be set up to adjudicate where the actual border between the Britannic Colony of New Surrey and Fezian Madasahatta lies ... but who knows how long that will take nor what could happen in the interim?

13 comments:
A good report . . . and your terrain and ships look great!
-- Jeff
Bluebear Jeff,
Many thanks for your kind comments.
I was great to get back into the colonial wargaming saddle again, and I hope to fight some more colonial battles in the very near future.
All the best,
Bob
Bob,
I was looking at the pictures. I know you do your colonial wargaming using your own history.. Are the "British" regulars in Zulu era uniforms, and the Madasahatta Rangers in the later khaki? It looks like the native troops are perhaps Egyptians? I think you mentioned you use Essex figures.
I have been trying to figure out what to order. I like the Essex figures, so I will probably go with those.
Bill
Bob,
I was trying to figure out what figures you were using for your colonials. I know you are using your own history for this. Are the "British" the Zulu era Essex figures? It looks like their opponents may be Egyptians.
I like the Essex figures, I have been trying to figure out what I am going to order.
Bill
I have a quandary. I liked the colonial idea and was thinking of doing that, only basing the map on the basin of the "great gray-green greasy Limpopo River, all set about with fever trees". The other idea was an Eastern European conflict set in two countries along a Danube-like river that allowed for riverine warfare as well as land warfare.
Life is all about choices...
Bill
Bill,
Sorry for not making a comment any sooner, but I have been on a cruise and accessing my blog has been somewhat difficult and sporadic at times.
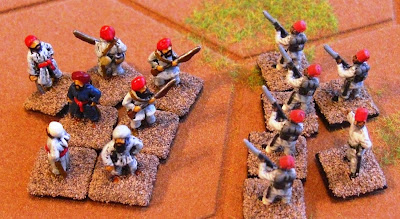
The 'Britannic' (British) Regulars are Essex Zulu War figures, the 'Fezians' (Egyptians) are Essex Sudan figures, the Slaver-traders are Irregular Miniatures Arab/North-West Frontier/Mahdist figures, and the 'Madasahatta Rangers' are Irregular Miniatures British Colonials.
I like the figures produced by both companies; the range of Essex figures tends to be more limited but Irregular have larger ranges, are cheaper … but tend to need a lot more ‘flash’ trimmed off them.
I hope that this is of help to you.
All the best,
Bob
Bill,
Why not do both ... but with only small armies for each. If you handle it right, you may even be able to switch figures - and especially river gunboats - from one area of conflict to another without too much difficulty.
All the best,
Bob
This is great! Just starting off in the Colonial period using Two Hour Wargame's Colonial Adventures and Peter Pig 15mm figures. Your blog is great inspiration - nice one ;)
Regards,
Monty
Monty,
I am glad that you enjoyed this particular battle report and that you have found the blog useful. I just wish I had enough time at present to do some more Colonial wargaming ... although I hope to do so in the New Year.
All the best,
Bob
That was really great! Just love the hexagonal terrain, and the miniatures looked great too. Also, the battle report took a turn I didn't expect! Thanks a lot!
Are those Kallistra (sp?) hexes? I've heard about them, but I can't find them here in the states. Also, where did you find your ships? They look good!
-- Bert
Bert Mueller,
I am glad that you enjoyed reading this battle report.
The hexes are Hexon II ones that are manufactured by Kallistra. I think that they don't have an agent in the US, and the cost of delivery from the UK is very high as the hexes are made from rigid plastic and not a lightweight foam.
The ships are all homemade from FIMO, which has the added advantage of being ready coloured and does not require painting.
All the best,
Bob
Hi Bob,
When can we expect more adventures?
-ajb
Brigadier General,
I have fought a few more colonial wargames, but the battle reports are all on my main blog. One day I will try to copy them over to this blog as well.
All the best,
Bob
Post a Comment